home about projects services contact

Wednesday, May 30, 2012

Happy Birthday GGB…


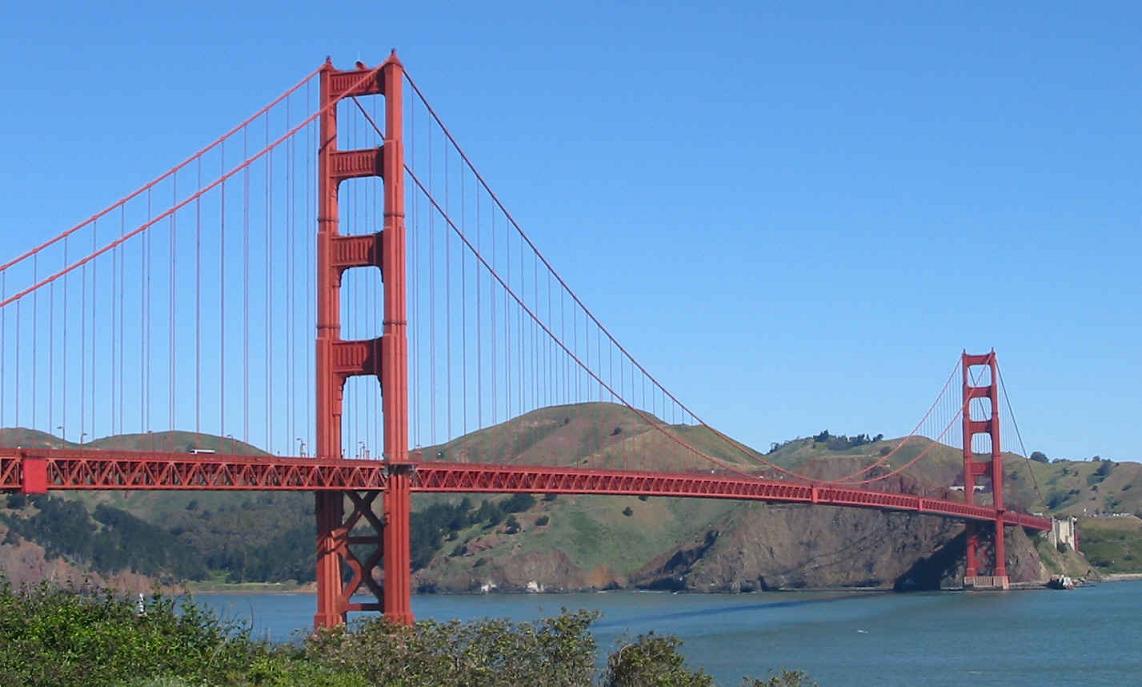
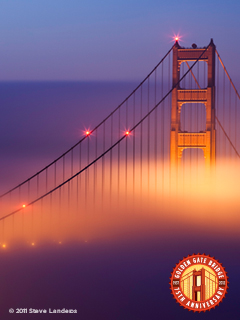
The San Francisco Golden Gate Bridge is currently celebrating its 75th anniversary! This beautiful bridge has been a stunning backdrop to many wonderful memories.

Being born and raised in the San Francisco Bay Area, I have driven over the Golden Gate Bridge dozens of times and thought it would be fun to share a few facts about this iconic landmark.

First, lets talk about that incredible color!

WHY IS THE GOLDEN GATE BRIDGE PAINTED INTERNATIONAL ORANGE?
The Golden Gate Bridge has always been painted orange vermilion, deemed "International Orange." Rejecting carbon black and steel gray, Consulting Architect Irving Morrow selected the distinctive orange color because it blends well with the span's natural setting as it is a warm color consistent with the warm colors of the land masses in the setting as distinct from the cool colors of the sky and sea. It also provides enhanced visibility for passing ships.
 
Currently, the paint is supplied by Sherwin Williams and is made to match the Bridge International Orange color formula. The closest off-the-shelf paint color that Sherwin Williams has available is "Fireweed" (color code SW 6328).
 
WHY THE NAME GOLDEN GATE?
The Golden Gate Strait is the entrance to the San Francisco Bay from the Pacific Ocean. The strait is approximately three-miles long by one-mile wide with currents ranging from 4.5 to 7.5 knots. It is generally accepted that the strait was named "Chrysopylae", or Golden Gate, by John C. Fremont, Captain, topographical Engineers of the U.S. Army circa 1846. It reminded him of a harbor in Instanbul named Chrysoceras or Golden Horn.
 
 
WHEN DID THE GOLDEN GATE BRIDGE OPEN?
The dream of spanning the Golden Gate Strait had been around for well over a century before the Golden Gate Bridge opened to traffic on May 28, 1937. Pedestrian Day was held on May 27, 1937.
 
HOW MANY RIVETS ARE THERE IN EACH GOLDEN GATE BRIDGE TOWER?
There are approximately 600,000 rivets in each tower.
 
 
WHAT MOVIES INCLUDE THE GOLDEN GATE BRIDGE?
A number of major motion pictures have included the Golden Gate Bridge as a backdrop or contain scenes filmed on the Golden Gate Bridge. Here is a small sampling:
The Maltese Falcon (1941): One of the best classic detective mysteries ever made. With a slow camera pan in a grayish 1940s, several San Francisco landmarks show up including the Golden Gate Bridge, the Ferry Building, and the Bay Bridge
Vertigo (1958): A story about a San Francisco detective and his psychological troubles with fear of heights and obsession over a woman. They spend some time at the Golden Gate Bridge.
High Anxiety (1977): This film was partially shot in San Francisco, with some scenes taking place in the lobby of the Hyatt Regency as well as under the Golden Gate Bridge.
Superman (1978): The Man of Steel (Christopher Reeve) arrives in time to save a school bus on the edge of the Bridge.
Interview with a Vampire (1994): A vampire tells his epic life story, with a dramatic ending on the Golden Gate Bridge.
X-Men: The Last Stand (2006): Magneto Man moves the Golden Gate Bridge...nothing to it!
Monsters vs. Aliens (2009): A monster named Susan moves vehicles on the Golden Gate Bridge. Susan is among the crew trying to save us from extra-terrestrial threats, and there's a standoff on the Bridge.
 
Golden Gate Bridge 75th Anniversary
 
You can find more facts and history about the Golden Gate Bridge on the website found here. Also be sure to visit the official Golden Gate Bridge – 75th Anniversary website here.
 
 
You will get all the info needed to attend various celebrations planned and they even offer free wallpaper to download to your computer so you can enjoy the view every day!

 
Have you ever been to San Francisco? Have you driven across the Golden Gate Bridge?


Monday, May 28, 2012

Friday, May 25, 2012

Guest Posting at Living Savvy…


Today I am guest posting over at Living Savvy!

A few weeks ago, I was contacted by Tiffany from Living Savvy, and she asked if I would like to participate in her Spray Painters Anonymous Series. My first thought was Yes! of course!


Like a lot of other bloggers, and DIY’ers, I love spray paint and use it often on projects around my home and for clients. Please stop over and see my latest addition to the yard using a plain door mat, some masking tape, and several fun colors of spray paint.

Have a safe and fun weekend…see you next week!

Thursday, May 24, 2012

Sprucing up the yard…part 2


Last month I talked about sprucing up the yard with a how to on planting outdoor pots with color and style…see that post here. Today, let’s take a little walk around the yard and see a few of the other projects I have been up to.

I started out with this trellis. I have had it for years and love the style…but it is rusted and a little dull. It blends into the fence so that you can barely notice it. I decided to freshen it up with some spray paint…

image

image

image

I gave this little sun, hanging on the fence nearby, the same treatment…

image

While I had this bright orange paint in hand, I spruced up a couple of other pieces of yard art for fun…

image

image

I love the combo of orange and turquoise as seen above. I will be using it in several places around the yard this summer. Using spray paint is the quickest, cheapest, and easiest way to freshen up your yard art, and add pops of color in a SNAP!

I love spray paint so much…I have been invited by Tiffany over at Living Savvy to participate in her Spray Painters Anonymous Series. Here is a little sneak peek of the project that she will be featuring…

image

Be sure to stop by Living Savvy tomorrow to see my guest post and tutorial on this fun addition to the yard.

What color combo are you featuring in your yard this summer?

Tuesday, May 22, 2012

From Dollar Store to Adorable…

I recently purchased these plain white candles in a glass at a local Dollar Store…

image


I think they call these 7 hour candles…so I am assuming they will burn for 7 hours! If that is indeed the case, they will be perfect to add lighting and ambience to the backyard Grad Party we are hosting in June.


The party’s color them is Red & Black – after the high school colors – & White. So I thought what better way to add interest and character than with some book pages! Time to find an old book and some Mod Podge…


image


Next step is to rip out some pages - cut them into strips - and simply glue them onto the glass…


image


image


I also bought a dozen of these smaller red candles in a glass jar…


image


I decided to give them a similar treatment with strips of book pages…


image


image


Already looking better than the plain Dollar Store candles, but still need a little more. I decided to add some red and black ribbon…


image


Much better…


image


image


Finally, from just plain Dollar Store…to Adorable!


image


image


image


I picked up some various dictionaries and reference books with red and black covers at our local thrift stores and garage sales. They will be fun to add to the décor and blend perfectly with the color scheme and theme…


image


I will be using more book page ideas around the party. One of the best posts for inspiration can be found over at The Nesting Place blog seen here


Pinned Image


Her book page decorating ideas are fantastic…and more like little works of art as you can tell by the image above! I really like the look of all of the projects made with book pages and think it will add a lot of fun to the party décor.


I plan to keep my projects a little more simple. Check out some of my inspiration photos on my Pinterest board - Grad Party 2012 - seen here.


Friday, May 18, 2012

Light up the night…


Hosting an outdoor party creates the perfect situation to consider how to light up the yard at night…


Pinned Image


Our backyard Grad Party will start at 4:00pm…and no doubt, last well into the evening hours, so I have been collecting ideas on how to add interesting lighting. Once again, Pinterest is an excellent source for inspiration…see my “Light Up The Night” pin board here.

Starting with my favorite option…string lights. I love the look of this type of outdoor lighting. There are many styles to choose from…


Pinned Image

Pinned Image

Pinned Image


They all create a warm and inviting ambience in any outdoor space…


Pinned Image

Pinned Image


Here is a clever way to make your own string lights with mason jars…


Pinned Image

I will definitely be wrapping some trees with light strands…

Pinned Image


I have rented several tables and umbrellas to set around the grass portion of the yard, so this would be a perfect option…


I know there are lots of umbrella lighting systems available…but what is so perfect about this idea is no electricity needed – so no cords to trip over!


I love the look of hanging globe style lanterns…


Pinned Image


And will certainly find a fun way to light up our swimming pool…


Pinned Image

Pinned Image


Finally, I already have plenty of tiki torches…


Pinned Image


Pinned Image


Love this idea of anchoring the torches in a bucket or pail. The added benefit of using tiki’s is that the oil will help keep insects and mosquitos away.

Now that I have all the ideas and inspiration…time to get busy and organize my lighting options for the party!

How do you light up your yard at night?


Pinned Image


Wednesday, May 16, 2012

Grad Party Invitations...


More graduation party plans going on around here. Today I want share with the you the how to on my homemade party invitations.

We decided to throw a Graduation Celebration for our oldest son, who is graduating from high school in June. He will be heading off to college in September and we thought a backyard party, for all of our family and friends, would be a perfect way to acknowledge and celebrate all of his success so far!

My first stop was browsing Pinterest for ideas and inspiration. I knew I wanted to keep it simple, and incorporate his school colors of Red & Black. Next stop, head to Michaels Craft Store for all the supplies needed. After browsing the aisles, with no exact design in mind, I found a few items that sent me in the perfect direction…

image

Red and white card stock and the cutest little stickers and washi style crafting tape in black will be perfect…

image

I determined that the red card stock could be cut into 4 even pieces and would be the perfect size to fit into the announcement envelopes. Then I printed out the party info onto the white card stock - placing 4 copies onto each page. Using my craft cutter, I cut out each invite, carefully measuring to be sure they would fit correctly onto the red backround…

image

image

Now for the fun part…embellishing the invite with the craft tape. I placed a strip of the banner style tape across the top, and a strip of the Congrats! along the bottom of each invitation – wrapping the excess around the back…

image

image

This tape was so quick and easy to use. Next I used a couple of strips of double sided tape to attach the white card on top of the red card stock. Now, time to add the raised ribbon sticker to the corner…

image

image

I purposely made the party invites the right size to just slip into his graduation announcements. After assembling the announcements, I slipped an invite into each one and sent them out last week!

image

image

We are looking forward to celebrating this wonderful milestone in my son’s life. I still find it hard to believe that he is heading off to college in just a few short months! In the meantime, we will enjoy this party with all of our dear family and friends.

Have you ever made your own invitations or cards? What are your favorite materials to use in making cards and paper crafts?


Linking up to...How to Nest for Less, Home Stories AtoZ, My Uncommon Slice of Suburbia, Uncommon Designs, Savvy Southern Style, Serenity Now, The Shabby Nest, Addicted to Decorating, Stuff & Nonsense, Redoux, Chic on a Shoestring, At the Picket Fence, Classy Clutter


01 09 10